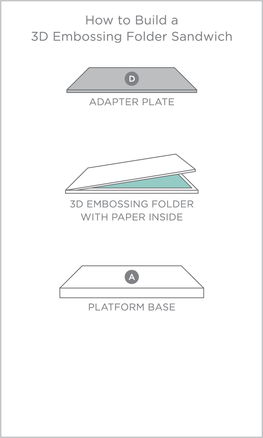
Spellbinders has introduced several high quality die cutting machines over the years. The current Platinum & Platinum 6 machines are the best in class manual die cutting and embossing. Below are the compatibility instructions and sandwich guides with the "Original Plate System." The NEW 2023 Platinum and Platinum 6 Machines now include the Universal Plate System, so please refer to those sandwich guides in that section below.

    Build sandwiches starting from bottom-up

  • Platform
  • Clear Cutting Plate
  • Paper, cardstock, craft foil. etc.
  • Shaped die template with cut ridges down.
  • Clear Cutting Plate
  • Run through the machine

    Build sandwiches starting from bottom-up

  • Clear Cutting Plate
  • Steel Rule Die with die facing up
  • Paper, cardstock, craft foil, etc
  • Clear Cutting Plate
  • Run through the machine

    Build sandwiches starting from bottom-up

  • Platform
  • Embossing Folder with paper inside
  • 3D Embossing Plate
  • Run through the machine

    Build sandwiches starting from bottom-up

  • Platform
  • Embossing Folder with paper inside
  • 3D Embossing Plate
  • Run through the machine

    Build sandwiches starting from bottom-up

  • Platform
  • Embossing Folder with paper inside
  • Tan Embossing Mat
  • Clear cutting plate (for single or double-sided Embossing Folders)
  • Run through the machine

    Build sandwiches starting from bottom-up

  • Platform
  • Spellbinders Impressabilities' Template
  • Paper, cardstock, craft foil, etc
  • Tan Embossing Mat
  • Blue Embossing Plate
  • Run through the machine

    Build sandwiches starting from bottom-up

  • Platform
  • Folder with paper inside
  • Blue Embossing Plate
  • Run through the machine

    Build sandwiches starting from bottom-up

  • A-Base Plate (white)
  • Shaped die template with cut ridges up.
  • Paper, cardstock, craft foil, etc.
  • C-Cutting Plate (grey)
  • Run through the machine

    Build sandwiches starting from bottom-up

  • A-Base Plate (white)
  • Shaped die template (cut ridges up) with cut shape inside
  • Tan Embossing Mat
  • B-Embossing Plate (blue)
  • Run through the machine

    Build sandwiches starting from bottom-up

  • A-Base Plate (grey)
  • Spellbinders Die with cut ridges up
  • Paper, cardstock, craft foil, etc
  • C-Cutting Plate (white)
  • Run through the machine

    Build sandwiches starting from bottom-up

  • A-Base Plate (grey)
  • Spellbinders Die with cut ridges up, die cut inside die
  • Spellbinders Tan Embossing Mat
  • B-Embossing Plate (pink)
  • Run through the machine

    Build sandwiches starting from bottom-up

  • B-Pink Embossing Plate
  • 3D M-Bossabilities Folder with Media Inside
  • D-Raspberry Adapter Plate
  • Run through the machine

    Build sandwiches starting from bottom-up

  • A-Base Plate (grey)
  • Embossing Folder with paper inside of it
  • D-Raspberry Adapter Plate
  • Run through the machine

    Build sandwiches starting from bottom-up

  • A-Base Plate (grey)
  • Spellbinders Impressabilities Template
  • Paper, cardstock, craft foil, etc
  • Tan Embossing Pad
  • B-Embossing Plate (pink)
  • Run through the machine

    Build sandwiches starting from bottom-up

  • C-Cutting Plate (White)
  • Embossing Folder with cardstock
  • D-Raspberry Adapter Plate
  • Run through the machine

    Build sandwiches starting from bottom-up

  • White Mat
  • Spacer Plate (W-017 White for Purple machines, W-024 Magnetic for Raspberry machines)
  • Spellbinders Die with cut ridges up
  • Paper, cardstock, craft foil, etc.
  • White Mat
  • Run through the machine

    Build sandwiches starting from bottom-up

  • White Mat
  • Spellbinders die with cut ridges up, die cut inside die
  • Spellbinders Tan Embossing Mat
  • White Mat
  • Run through the machine

    Build sandwiches starting from bottom-up

  • Wizard White Plate
  • Tan Embossing Mat
  • 3D Embossing Folder with paper inside
  • Tan Embossing Mat
  • Grand Calibur Junior A-Base Plate
  • Run through the machine

    Build sandwiches starting from bottom-up

  • White Mat
  • Tan Embossing Mat
  • Embossing Folder with paper inside
  • Grand Calibur Junior Raspberry Plate
  • Run through the machine

    Build sandwiches starting from bottom-up

  • White Mat
  • Tan Embossing Mat
  • Embossing Folder with paper inside
  • Grand Calibur Junior Raspberry Plate
  • Run through the machine

    For the Purple Wizard
    Build sandwiches starting from bottom-up

  • White Mat
  • Embossing folder with paper inside of it
  • White Mat
  • Run through the machine

    For the Rasberry Wizard
    Build sandwiches starting from bottom-up

  • White Mat
  • Embossing folder with paper inside of it
  • Tan Embossing Mat
  • GC-009 Grand Calibur Junior Cutting Plate
  • Run through the machine

    Build sandwiches starting from bottom-up

  • White Mat
  • Fiskars Texture Plate
  • Paper, cardstock, craft foil, etc
  • Tan Embossing Pad
  • W-003 Blue Charm Embossing Mat
  • Run through the machine

The NEW Universal Plate System adds even more compatibility for your Platinum Machines with a longer platform and plates for Slimline dies and embossing folders. Works with most brands of etched dies, 2D and 3D embossing folders. This new system is a set of seven pieces that work in manual die-cutting machines such as the Platinum™ ®, Platinum 6™ ® and Big Shot™ ® Machines. The new longer size allows versatility when die-cutting and embossing. It will accommodate slimline dies and larger embossing folders. It will also work with most brands of thin metal cutting dies, steel rule dies, 2D and 3D Embossing Folders by layering the plates. It will be the only plate system you will need!

    Build sandwiches starting from bottom-up

  • Platform Base
  • Platform Top
  • Cutting Plate
  • Paper, cardstock, craft foil, etc.
  • Shaped die template with cut ridges down.
  • Cutting Plate
  • Run through the machine

    Build sandwiches starting from bottom-up

  • Platform Base
  • Platform Top
  • Cutting Plate
  • Paper, cardstock, craft foil, etc.
  • Embossing Mat
  • Adapter Plate
  • Run through the machine

    Build sandwiches starting from bottom-up

  • Platform Base
  • Platform Top
  • Standard Embossing Folder with the paper or cardstock inside
  • Cutting Plate
  • Run through the machine

    Build sandwiches starting from bottom-up

  • Platform Base
  • 3D Embossing Folder with the paper or cardstock inside
  • Adapter Plate
  • Run through the machine

Build sandwiches starting from bottom-up

  • Clear Cutting Plate
  • Steel Rule Die with die facing up
  • Paper, cardstock, craft foil, etc
  • Clear Cutting Plate
  • Run through the machine

Nothing says “WOW” like foil. With the Spellbinders Glimmer Hot Foil System you can now add these stunning and eye-catching features to any card or mixed media project. Foiled Elements can also be added to various materials and thicknesses with your Platinum Die Cutting & Embossing machine and more. see below for the how to use instructions and sandwich guide.

HOW TO HOT FOIL WITH THE GLIMMER HOT FOIL SYSTEM

    Build sandwiches starting from bottom-up

  • Glimmer Platform
  • Heated Glimmer Plate
  • Place Glimmer Foil (shiny side facing down) on the hot foil plate
  • Add desired material and the necessary shims*
  • Roll it slowly through the Spellbinders® Platinum™ or Platinum 6 Machine

    Build sandwiches starting from bottom-up

  • Plug in, turn on Machine and wait for it to heat up
  • Place Etched/Wafer-thin die on the heating surface. Press Timer button and wait until it turns solid green.
  • Place Glimmer Foil (shiny side facing down) on the etched die
  • Add desired material and the necessary Shims. See Material chart
  • Remove the whole Platform and sandwich and roll it slowly through the machine

    You can follow a similar sandwich to the Spellbinders plates, though please keep in mind that Non-Spellbinder plate thickness can vary. You may need to remove or add shims to get your sandwich to the perfect amount of pressure.

    Build sandwiches starting from bottom-up

  • Glimmer Platform
  • Heated Plate
  • Place Glimmer Foil (shiny side facing down) on the hot foil plate
  • Add desired material and the necessary shims*
  • Roll it slowly through the Spellbinders® Platinum™ or Platinum 6 Machine
  • Glimmer Compatible Die-Cutting Machines:

    • Spellbinders Platinum, Platinum 6
    • Deep Sea Die Cutting and Embossing Machine
    • Sizzix BigShot
    • Sizzix BigKick
    • Sizzix Big Shot Plus
    • Sizzix Big Shot Express
    • Tim Holtz Vagabond
    • We R Memory Keepers Evolution
    • RG Amaze

    Do not Heat Up Platform for Letterpress

    Build sandwiches starting from bottom-up

  • Ink the Glimmer Plate or leave it not inked
  • Place Glimmer Plate on the Platform
  • Add desired material and the necessary Shims. See Material chart.
  • Remove the whole Platform and sandwich and roll it slowly through the machine

The BetterPress Letterpress system is great because it works with so many other machines! A rule of thumb is that any machines that can Glimmer, or can cut Steel Rule Dies can also use BetterPress. The BetterPress system is NOT compatible with any machines that can't cut Steel Rule Dies or that don't have at least a 6" wide platform. If you still aren't sure don't worry, we've listed the compatible machines out for you.

Machines BetterPress is compatible with:

  • Spellbinders Platinum, Platinum 6
  • Deep Sea Die Cutting and Embossing Machine
  • Sizzix BigShot
  • Sizzix Big Shot Plus
  • Sizzix BigKick
  • Sizzix Switch
  • Tim Holtz Vagabond
  • We R Memory Keepers Evolution
  • RG Amaze

Machines BetterPress is NOT compatible with:

  • Cuttlebug
  • Gemini
  • Gemini II
  • Anna Griffin Empress
  • Machines that can't cut Steel Rule Dies
  • Machines that have a platform smaller than 6" wide

Have another brand's die cutting & embossing machine?

No problem, many of our products are compatible in several other brands machines. This sandwich guides does not include all brands or machines. You may have to test sandwich combinations and shims to get the sandwich pressure just right.

Build sandwiches starting from bottom-up

WITH UNIVERSAL PLATFORM

  • Platform with tabs closed.
  • Spellbinders Die with cut ridges up
  • Paper, cardstock, craft foil, etc
  • Two acrylic mats
  • Run through the machine

WITH SOLO PLATFORM

  • Sizzix Solo Platform with Shim
  • Sizzix Solo Thin Die Adapter
  • Sizzix Clear Cutting Pad
  • Spellbinders Die with cut ridges up
  • Paper, cardstock, craft foil, etc
  • Sizzix Clear Cutting Pad
  • Run through the machine

Build sandwiches starting from bottom-up

WITH UNIVERSAL PLATFORM

  • Platform with tabs closed
  • Spellbinders Die with cut ridges facing up, die cut inside die
  • Two Spellbinders Tan Embossing Pads
  • Tri Fold piece of 12 x 6" cardstock, place on top of embossing mats
  • One acrylic mat
  • Run through the machine

WITH SOLO PLATFORM

  • Sizzix Solo Platform with Shim
  • Sizzix Impressions Pad
  • Spellbinders Die with cut ridges up, die cut inside die
  • Sizzix Silicone Rubber Pad
  • Sizzix Clear Cutting Pad
  • Run through the machine

Build sandwiches starting from bottom-up

Multipurpose Platform

  • 3D Embossing Folder with paper inside
  • Cutting Plate
  • Run through the machine

Build sandwiches starting from bottom-up

WITH UNIVERSAL PLATFORM

  • Platform with tabs closed
  • 2 pieces of 65# cardstock as a shim
  • Spellbinders Embossing Folders with media inside
  • Cutting Plate
  • Run through the machine

WITH SOLO PLATFORM

  • Sizzix Solo Platform with Shim
  • Spellbinders Em-bossing Fold’ers with media inside
  • Spellbinders Enlarged Tan Embossing Pad
  • 3 sheets of cardstock as shims (approx. 70-80 lb. cardstock)
  • Cutting Plate
  • Run through the machine

Build sandwiches starting from bottom-up

  • Clear cutting pad
  • Spellbinders Contour Steel Rule Die
  • Paper, cardstock, craft foil, etc
  • Clear cutting pad
  • Run through the machine

Build sandwiches starting from bottom-up

  • Glimmer Platform
  • Heated Glimmer Plate
  • Place Glimmer Foil (shiny side facing down) on the hot foil plate
  • Add desired material and the necessary shims*
  • Roll it slowly through the Machine

Build sandwiches starting from bottom-up

  • A Plate
  • C Plate
  • Spellbinders Die with cut ridges up
  • Paper, cardstock, craft foil, etc.
  • B Plate.
  • Run through the machine

Build sandwiches starting from bottom-up

  • A Plate
  • Spellbinders Die with cut ridges up, die cut inside die
  • Spellbinders Tan Embossing Mat
  • Two or three pieces of cardstock (too much cardstock could result in B plate breakage)
  • Two B Plates
  • Run through the machine

Build sandwiches starting from bottom-up

  • A Plate
  • 3D M-Bossabilities Folders with media inside
  • One piece of 65# cardstock to shim
  • C Plate
  • Run through the machine

Build sandwiches starting from bottom-up

  • A Plate
  • Embossing Folder with media inside
  • 3 pieces of 65# cardstock as a shim
  • C Plate
  • Run through the machine

Build sandwiches starting from bottom-up

  • Plate B
  • Paper, cardstock, craft foil, etc
  • Contour die face down
  • Plate B
  • Run through the machine

Build sandwiches starting from bottom-up

  • Dial setting 12
  • Platform
  • Spellbinders Die with cut ridges up
  • Paper, cardstock, craft foil, etc.
  • Cutting Mat
  • Run through the machine

Build sandwiches starting from bottom-up

  • Platform
  • Spellbinders Die with cut ridges up, die cut inside die
  • Embossing Mat
  • Cutting Mat
  • Run through the machine

Build sandwiches starting from bottom-up

  • Dial setting 9
  • Platform
  • Embossing Folder with paper inside
  • Cutting Mat
  • Run through the machine

Build sandwiches starting from bottom-up

  • Dial setting 11
  • Spellbinders Steel Rule Die
  • Paper, cardstock, craft foil, etc.
  • Cutting Mat
  • Embossing Mat
  • Run through the machine

Build sandwiches starting from bottom-up

  • Platform
  • Spellbinders Impressabilities Template
  • Paper, cardstock, craft foil, etc.
  • Embossing Mat
  • Cutting Mat
  • Run through the machine

Build sandwiches starting from bottom-up

  • Glimmer Platform
  • Heated Glimmer Plate
  • Place Glimmer Foil (shiny side facing down) on the hot foil plate
  • Add desired material and the necessary shims*
  • Roll it slowly through the Machine

Build sandwiches starting from bottom-up

  • Platform D
  • Platform C
  • Platform B
  • Magnetic Shim
  • Spellbinders Die with cut ridges up
  • Paper, cardstock, craft foil, etc.
  • Platform A
  • Run through the machine

Build sandwiches starting from bottom-up

  • Platform D
  • Platform C
  • Platform B
  • Spellbinders Die with cut ridges up, die cut inside die
  • Rubber Mat
  • Platform A
  • Run through the machine

Build sandwiches starting from bottom-up

  • Platform D
  • 3D Embossing Folder with paper inside
  • Platform C
  • Magnetic Shim
  • Platform B
  • Run through the machine

Build sandwiches starting from bottom-up

  • Platform C
  • Embossing Folder with paper inside
  • Platform B
  • Magnetic Shim
  • Platform D
  • Run through the machine

Build sandwiches starting from bottom-up

  • Platform D
  • Platform C
  • Platform B
  • Spellbinders Impressabilities Template
  • Paper, cardstock, craft foil, etc
  • Rubber Mat
  • Platform A
  • Run through the machine

Build sandwiches starting from bottom-up

  • Platform C
  • Contour die face up
  • Paper, cardstock, craft foil, etc
  • Platform A
  • Run through the machine

Build sandwiches starting from bottom-up

  • Glimmer Platform
  • Heated Glimmer Plate
  • Place Glimmer Foil (shiny side facing down) on the hot foil plate
  • Add desired material and the necessary shims*
  • Roll it slowly through the Machine