
Tax included. Shipping calculated at checkout.
 />
/>


Introduction to Die Cutting
One of the most popular techniques in card making and paper crafting is die cutting. As a new crafter, (or an experienced crafter who hasn’t jumped into die cutting,) the machines, types of dies, and options might feel overwhelming. Today let’s break it down and simplify the crafty questions you have about die cutting machines and techniques so you can cut and emboss like a BOSS.
Die Cutting Video Series
What is die cutting?
Let’s start at the beginning and make sure we’re all on the same page. What even is die cutting? Put simply, die cutting involves using a die (a metal shape with cutting lines) rolled through a machine to cut paper or other thin materials. Think of it like a cookie cutter for paper. You can cut the same shape countless times, quickly and easily.
What kinds of dies are there?


Dies are often referred to as thin metal dies, or steel rule dies. If you’ve ever spent time in an elementary school, you may remember the thick dies and large machine used to create bulletin board letters and shapes. Those dies are steel rule dies. Steel rule dies can cut thicker materials, and more layers of paper at one time.
Thin metal dies are exactly as they sound - thin metal. Often you’ll find thin metal dies that coordinate with stamp sets, allowing you to stamp and cut out that stamped image with ease. You’ll also find nesting dies, which are basic shapes that come in concentric sizes, perfect for creating matted layers or providing just the exact size shape you need. Common nesting die shapes are circles, squares, diamonds, tag shapes, and assorted labels. Nesting dies are a powerhouse addition to your collection, because you’ll use them again and again for everything from cards and scrapbook pages, to household and school projects.
(Here’s a pro tip: die cut commonly used shapes, like circles and tags, ahead of time and keep them handy to pull ready-cut shapes when you’re creating cards and crafts.)
Thin metal dies can also be used to create sentiments, intricate backgrounds, floral elements, and even 3D shapes like boxes and envelopes. From the most basic shapes to detailed works of art, you’ll be amazed by what you can create with die cutting.
What about die cutting machines?

Now that you know all about the dies, let’s chat about the machines that make the magic happen! Spellbinders Platinum and Platinum Six die cutting and embossing machines are beautiful on the outside, and built with VersaCut technology and solid steel core construction on the inside. Guess what that means? Both machines are best-in-class to handle the most intricate dies and they are powerhouses of strength and durability.
What is the difference between the Platinum and Platinum Six machines?

The Platinum and the Platinum Six machines are almost identical except for their size. If space constraints are an issue, or you mostly cut small die cut shapes, the Platinum Six with its 6” wide cutting surface might be perfect for you. If you like to cut larger format dies, or want to cut a lot of dies at once, and have a little more crafty space to work with, the full size Platinum, with its 8.5” wide cutting surface is the machine for you!
Both the Platinum and Platinum Six have the same amazing VersaCut technology and solid steel core construction, and both can cut as well as emboss. Both machines can accommodate a wide variety of dies, including Spellbinders steel rule dies, and will cut through over 40 different media from cardstock, papers and foils to light-weight materials such as thin chipboard, fabrics and thin leather. (Heavier weight materials will need to be cut with a steel rule die.) Both machines can also be used with Spellbinders Glimmer Hot Foil System, for adding shimmering foiled elements to crafts.
I have my die cutting machine! What now?
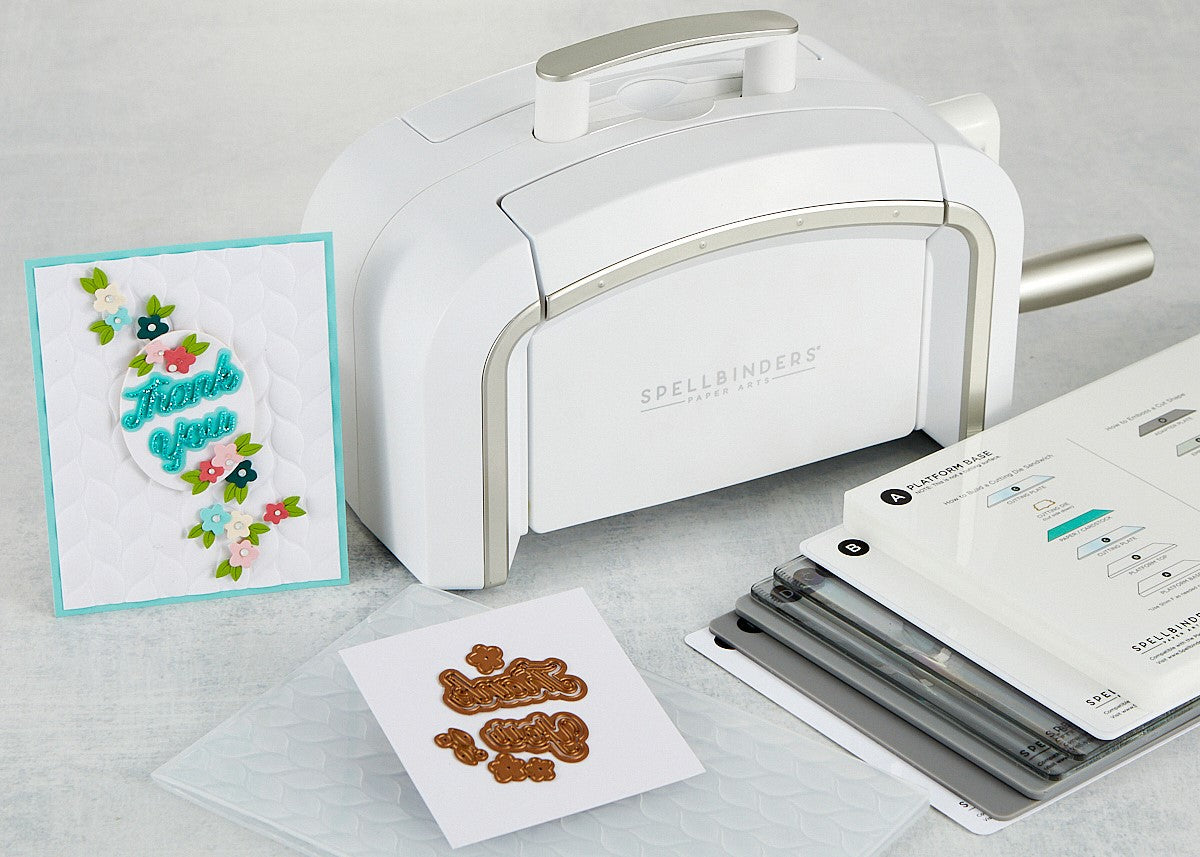
As you explore your new machine, you’ll agree that some of the best design elements of the Platinum and Platinum Six are in the details. You’ll love the way both side trays fold up for compact storage. The retractable carrying handle allows you to easily move your machine, whether you need to carry it across the house, take it to a crop, or travel with it.
When you unbox your machine, you’ll find that the crank to roll dies through the machine, comes unattached. Have no fear, it’s simple to attach and everything you need is included. In fact, we’ve got a quick unboxing video you can watch, so you’ll know exactly what to do. You’ll attach the crank to the metal post, add the washer and screw, and tighten it in place with the included wrench. Pop the plastic stopper on top and you’re literally ready to ROLL. (Here’s another pro tip: Keep that wrench in your craft space, so that if you ever need to tighten the screw, or remove the crank for easy packing, you have it handy.)
How do i use the platform and plates for the Platinum/Platinum Six? (And what's a die cutting sandwich?)

Your die cutting machine comes with a few different plates and platform necessary to perform cutting and embossing. We refer to everything that gets rolled through the machine as a sandwich, and the layers of your sandwich should be stacked in the correct order to prevent damage to your machine.
The standard Platinum or Platinum Six includes the standard platform, two cutting plates, an embossing plate, and embossing mat. Check out the Operation Instructions, or the manual that came in your box, for an easy visual reference of the sandwiches for die cutting and embossing.
What’s the standard die cutting sandwich for wafer-thin dies?
Stacking from the bottom up, here’s the sandwich for wafer-thin dies:
1. Platform (Think of this as the plate your sandwich sits on.)
2. Cutting Plate (First slice of bread)
3. Paper, cardstock, etc. (The yummy meat and cheese inside the sandwich)
4. Shaped die with cut ridges facing down (Lettuce and tomato anyone?)
5. Cutting Plate (The second piece of bread to finish it off!)
Roll your sandwich through the machine, and you have officially die cut your first shape!
What’s the die cutting sandwich for steel rule dies?
This sandwich is the same, except you’ll skip the thick platform, because steel rule dies are thicker than wafer-thin metal dies. Stacking from the bottom up, here is the sandwich for steel rule dies:
1. Cutting Plate
2. Steel Rule Die with die facing up
3. Paper, cardstock, etc.
4. Cutting plate
What About Spellbinders’ Universal Plate System?

Spellbinders new Universal Plate System adds more compatibility for your Platinum machines. The new longer size allows versatility when die cutting and embossing. It will accommodate slimline dies and larger embossing folders. It will also work with most brands of thin metal dies, steel rule dies, 2D and 3D embossing folders by layering the plates accordingly.
Want a quick sandwich reference sheet? Download or print this handy guide and keep it near your machine for easy reference. The sandwiches are also printed on the platform layer of your Universal Plate System.
What should I know about the cutting plates for my Platinum/Platinum Six?

Your die cutting machine comes with two cutting plates. These plates may be clear, a translucent color, or you might even have fancy glittered cutting plates!
They also come in a few different sizes, but no matter the color or size, cutting plates all function the same way. All of your die cutting sandwiches will require two cutting plates. (Remember, they’re the bread of your sandwich.)
Each time you die cut, the dies will leave a ghost impression or cut marks on one cutting plate. You’ll want to flip the cutting plates (particularly the one with the cut marks) occasionally and use both sides to promote even wearing.
Over time the plate with the cut marks will warp and possibly crack. Using both sides of the plate will extend the life of your plates. Most people try to use one plate as the one that is cut into, so one plate stays “clean”. Cutting plates are consumable items. Eventually they will need to be replaced. Check out the options for extended length, and 6x6 sized plates to suit your needs.
Can you tell me about embossing with the Platinum/Platinum Six?

The power of Spellbinders machines doesn’t end with die cutting! Use embossing folders to create amazing depth and dimension for cards and crafts. Spellbinders embossing folders can texturize the surface of various card sizes from A2 (4.25 x 5.5-inch) to larger card formats like 5x7 and slimline size (3.5 x 8.5-inch).
Our 3D embossing folders take the dimension up another notch for extra deep impressions that you’ll have to feel to believe! To emboss with your Platinum or Platinum Six, you’ll make a sandwich and roll it through your machine.
(Here’s a pro tip: Create a letter press effect by applying ink to one side of the folder, before rolling it through the machine. Just be sure to wash it afterwards!)
What’s the sandwich for Spellbinders standard embossing folders?
Stacking from the bottom up:
1. Platform
2. Embossing folder with paper inside
3. Cutting plate
What’s the sandwich for Spellbinders 3D embossing folders?
Stacking from the bottom up:
1. Platform Base (A)
2. 3D Embossing Folder with paper inside
3. Adapter Plate (D)*
(*3D embossing folders require the Universal Plate System)
(Here’s a pro tip: For the most detailed impression, lightly mist the cardstock on both sides with water before embossing.)
Can you tell me about foiling with the Glimmer Hot Foil System?

Another super power of the Platinum machines is its compatibility with the Spellbinders Glimmer Hot Foil System. Nothing says “WOW” like foil.
With the Spellbinders Glimmer Hot Foil System you can add stunning and eye-catching features to any card or craft. Just heat the platform & chosen plate, create your foiling sandwich, and then run the platform through your die cutting machine. Foiled elements can be added to various materials, such as cardstock, fabric, ribbon, leather, and more.
You can even create foiled designs using some of your existing metal dies. Be sure to visit our Get Started With Glimmer page for instructions, tips, techniques and more.
What’s the sandwich for Glimmer Hot Foil plates?
Stacking from the bottom up:
1. Glimmer platform
2. Heated Glimmer plate
3. Glimmer foil (shiny side facing DOWN) over plate
4. Cardstock or desired material
5. Glimmer Thin Shim and/or Spacer Pad depending on material used. (See chart for more details)
Are Glimmer plates the same thing as dies?

Glimmer Hot Foil Plates are made to be used with the Glimmer Hot Foil System, enabling the transfer of foiled designs including borders, backgrounds, sentiments, and more. Some may look similar to thin metal dies used for die cutting, but they are different.
Glimmer plates can not be used for die cutting, although there are some dies which can be used for foiling. You’ll want to experiment because some dies do not translate well to foiling. When using dies, you will need to add an extra cardstock shim or two because the dies are slightly thinner than the Glimmer plates.
WHAT'S IN THE BOX

- Platen
- Chase
- Shims
- BetterPress Cotton Card Panels
- Best Ever Craft Tape
- BetterPress Ink
- BetterPress Press Plates
Additional Die Cutting Resources
Die Cutting Youtube Series
In-depth educational die cutting video tuturials.
Original and Universal Plate System PDF
Download this Die Cutting sandwich cheat sheet.
Shop Die Cutting Machines & Accessories
Are you ready to shop? Spellbinders has everything you need to start or continue die cutting!
Shop Die Collections
Choose from our ever-growing library of Spellbinders designs to cut shapes that embellish your world.
Shop Die Cutting Tools
Spellbinders offer a wide variety of complementary tools and accessories for your crafting needs.
FAQ
Project Inspiration
How To BetterPress

1
Place three Shims on base of Chase and layer magnet insert over Shims. Place BetterPress Press Plate on Chase (the magnet insert will keep the press plate from moving); use registration lines to determine correct placement.
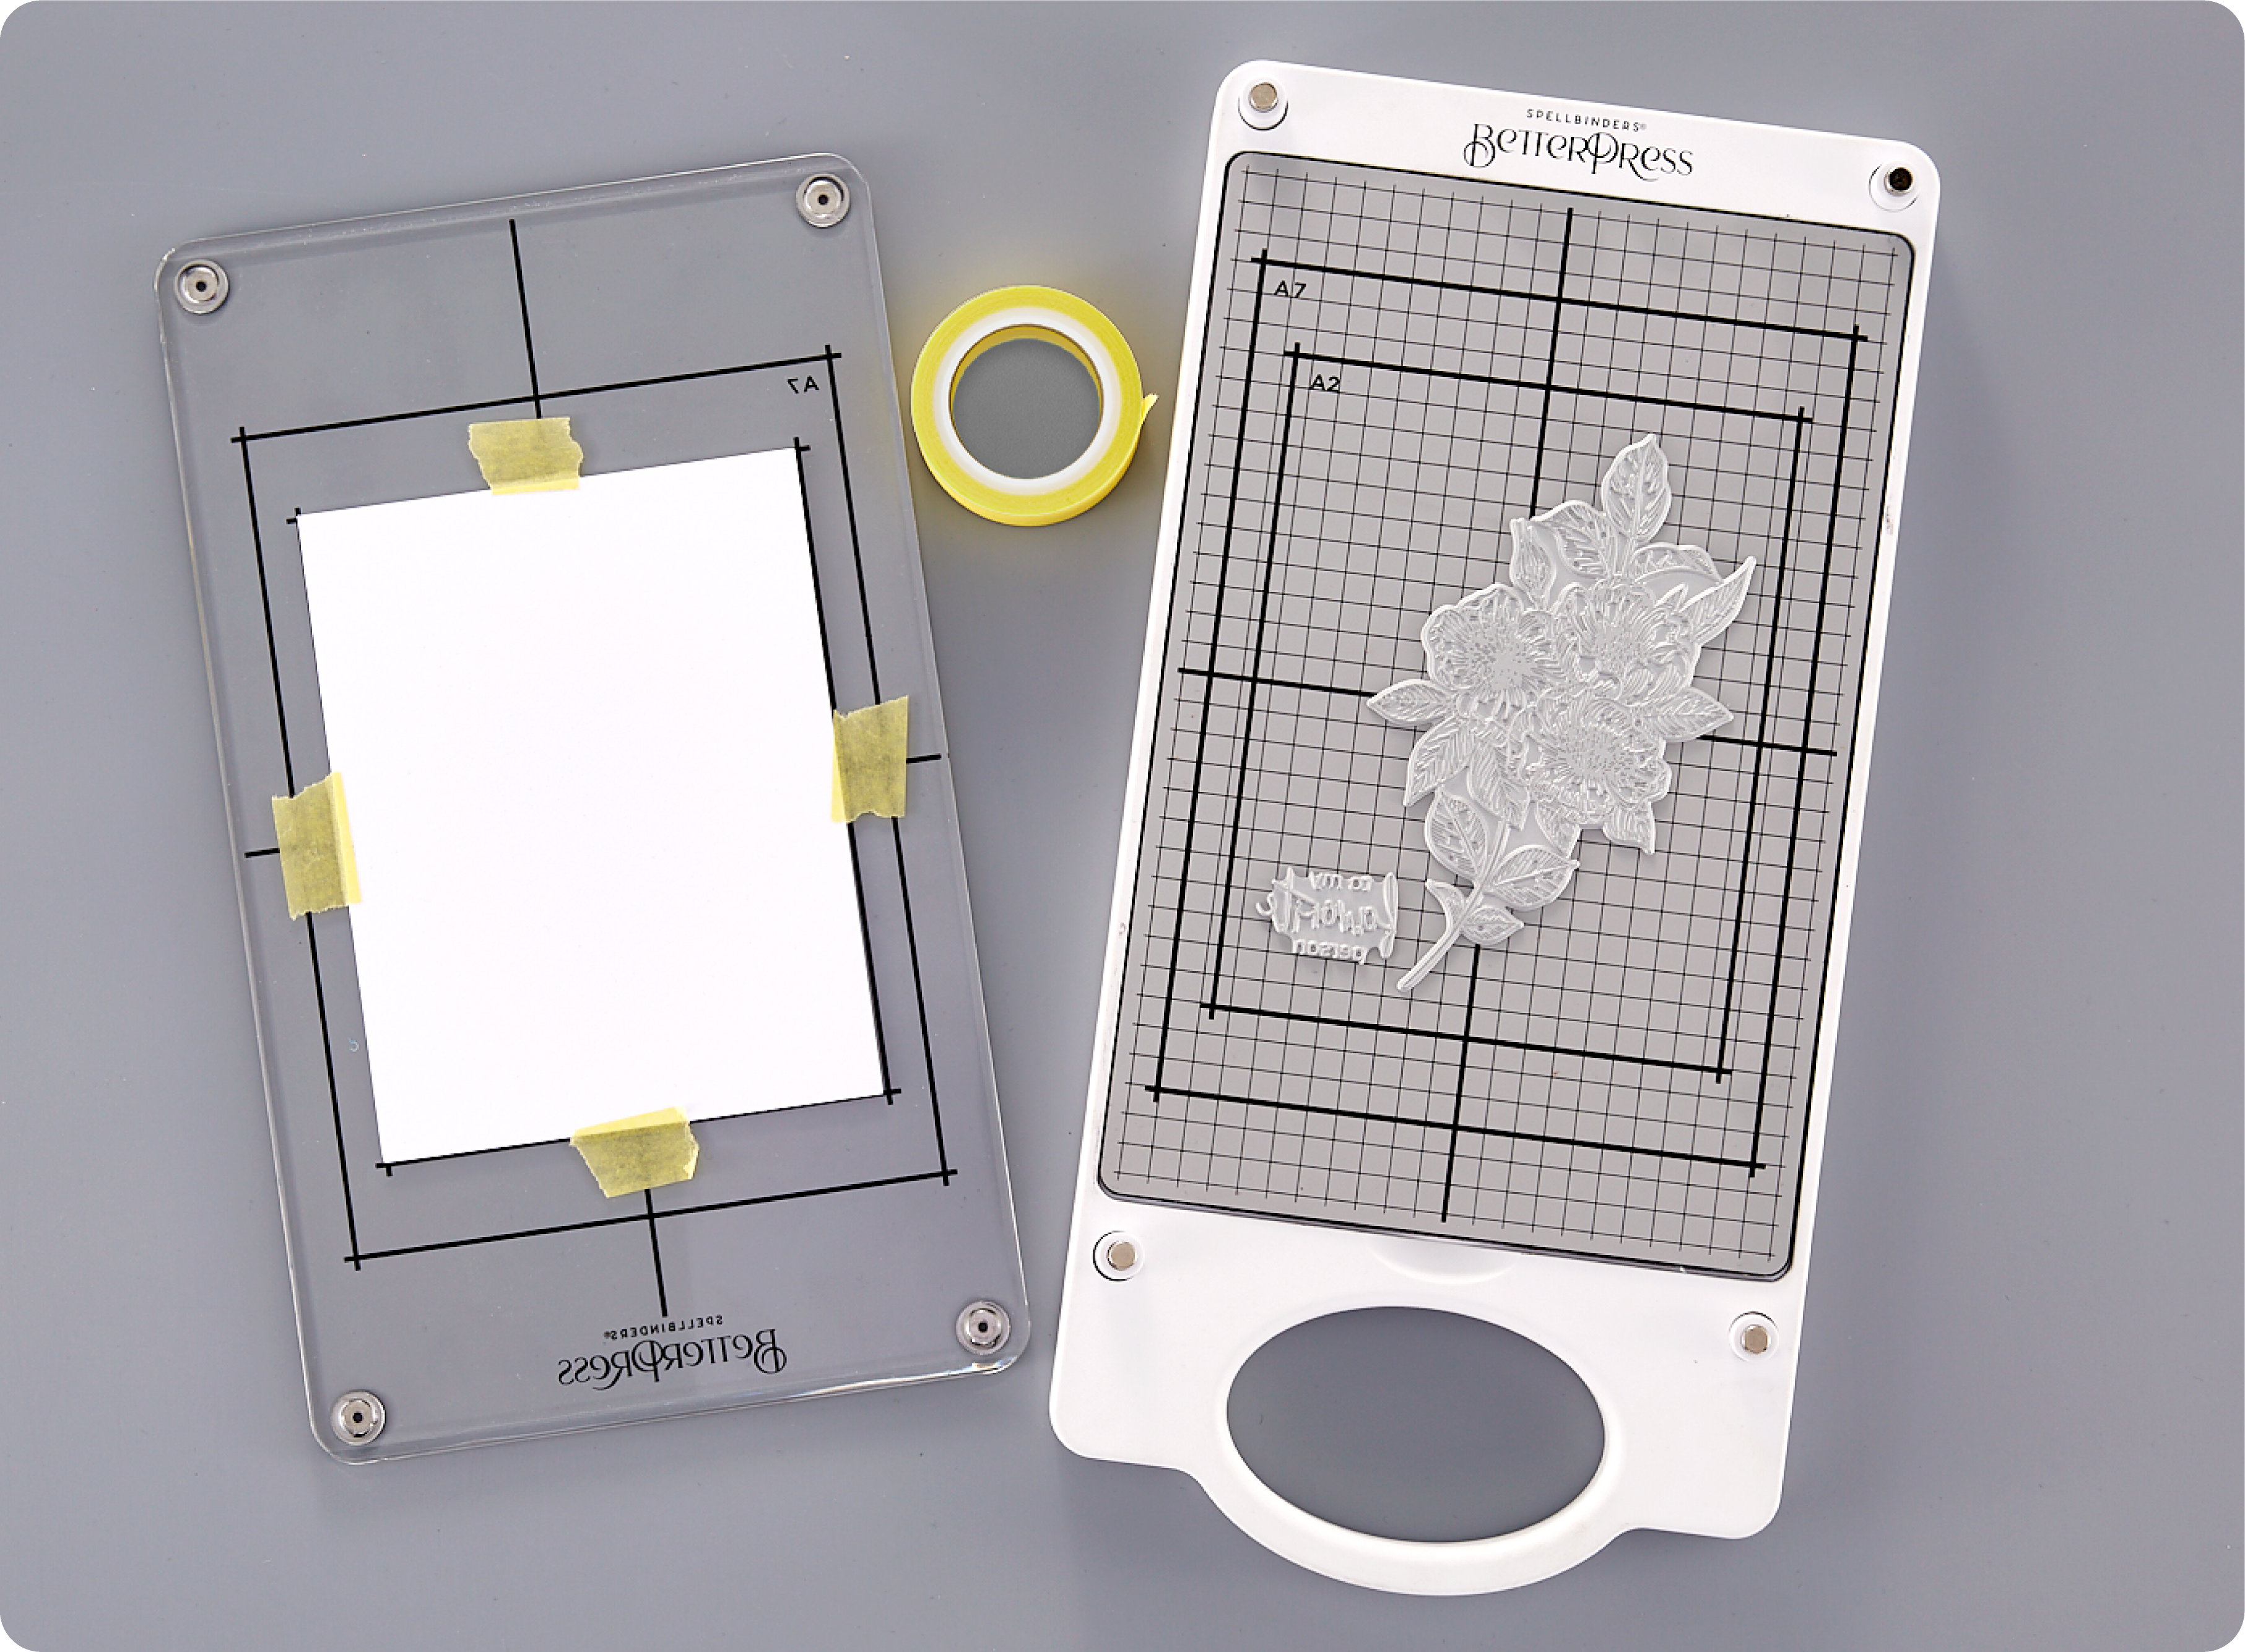
2Place card panel on underside of Platen and use Best Ever Craft Tape to secure in place. The registration marks on the Platen match the marks on the Chase.

3Open BetterPress Ink Pad; lightly tap raised ink pad across the BetterPress Press Plate. The ink pad is raised enough that a brayer is not needed. Note: make sure to use a well inked pad; reink pads when necessary with BetterPress Ink Re-Inkers

4
Align Platen to gently sit on the 4 corner spring pins on the Chase. Do not press down.

5Place Chase with Platen onto manual die cutting machine. The machine rollers will evenly press down on Platen as the Chase is run through the machine.
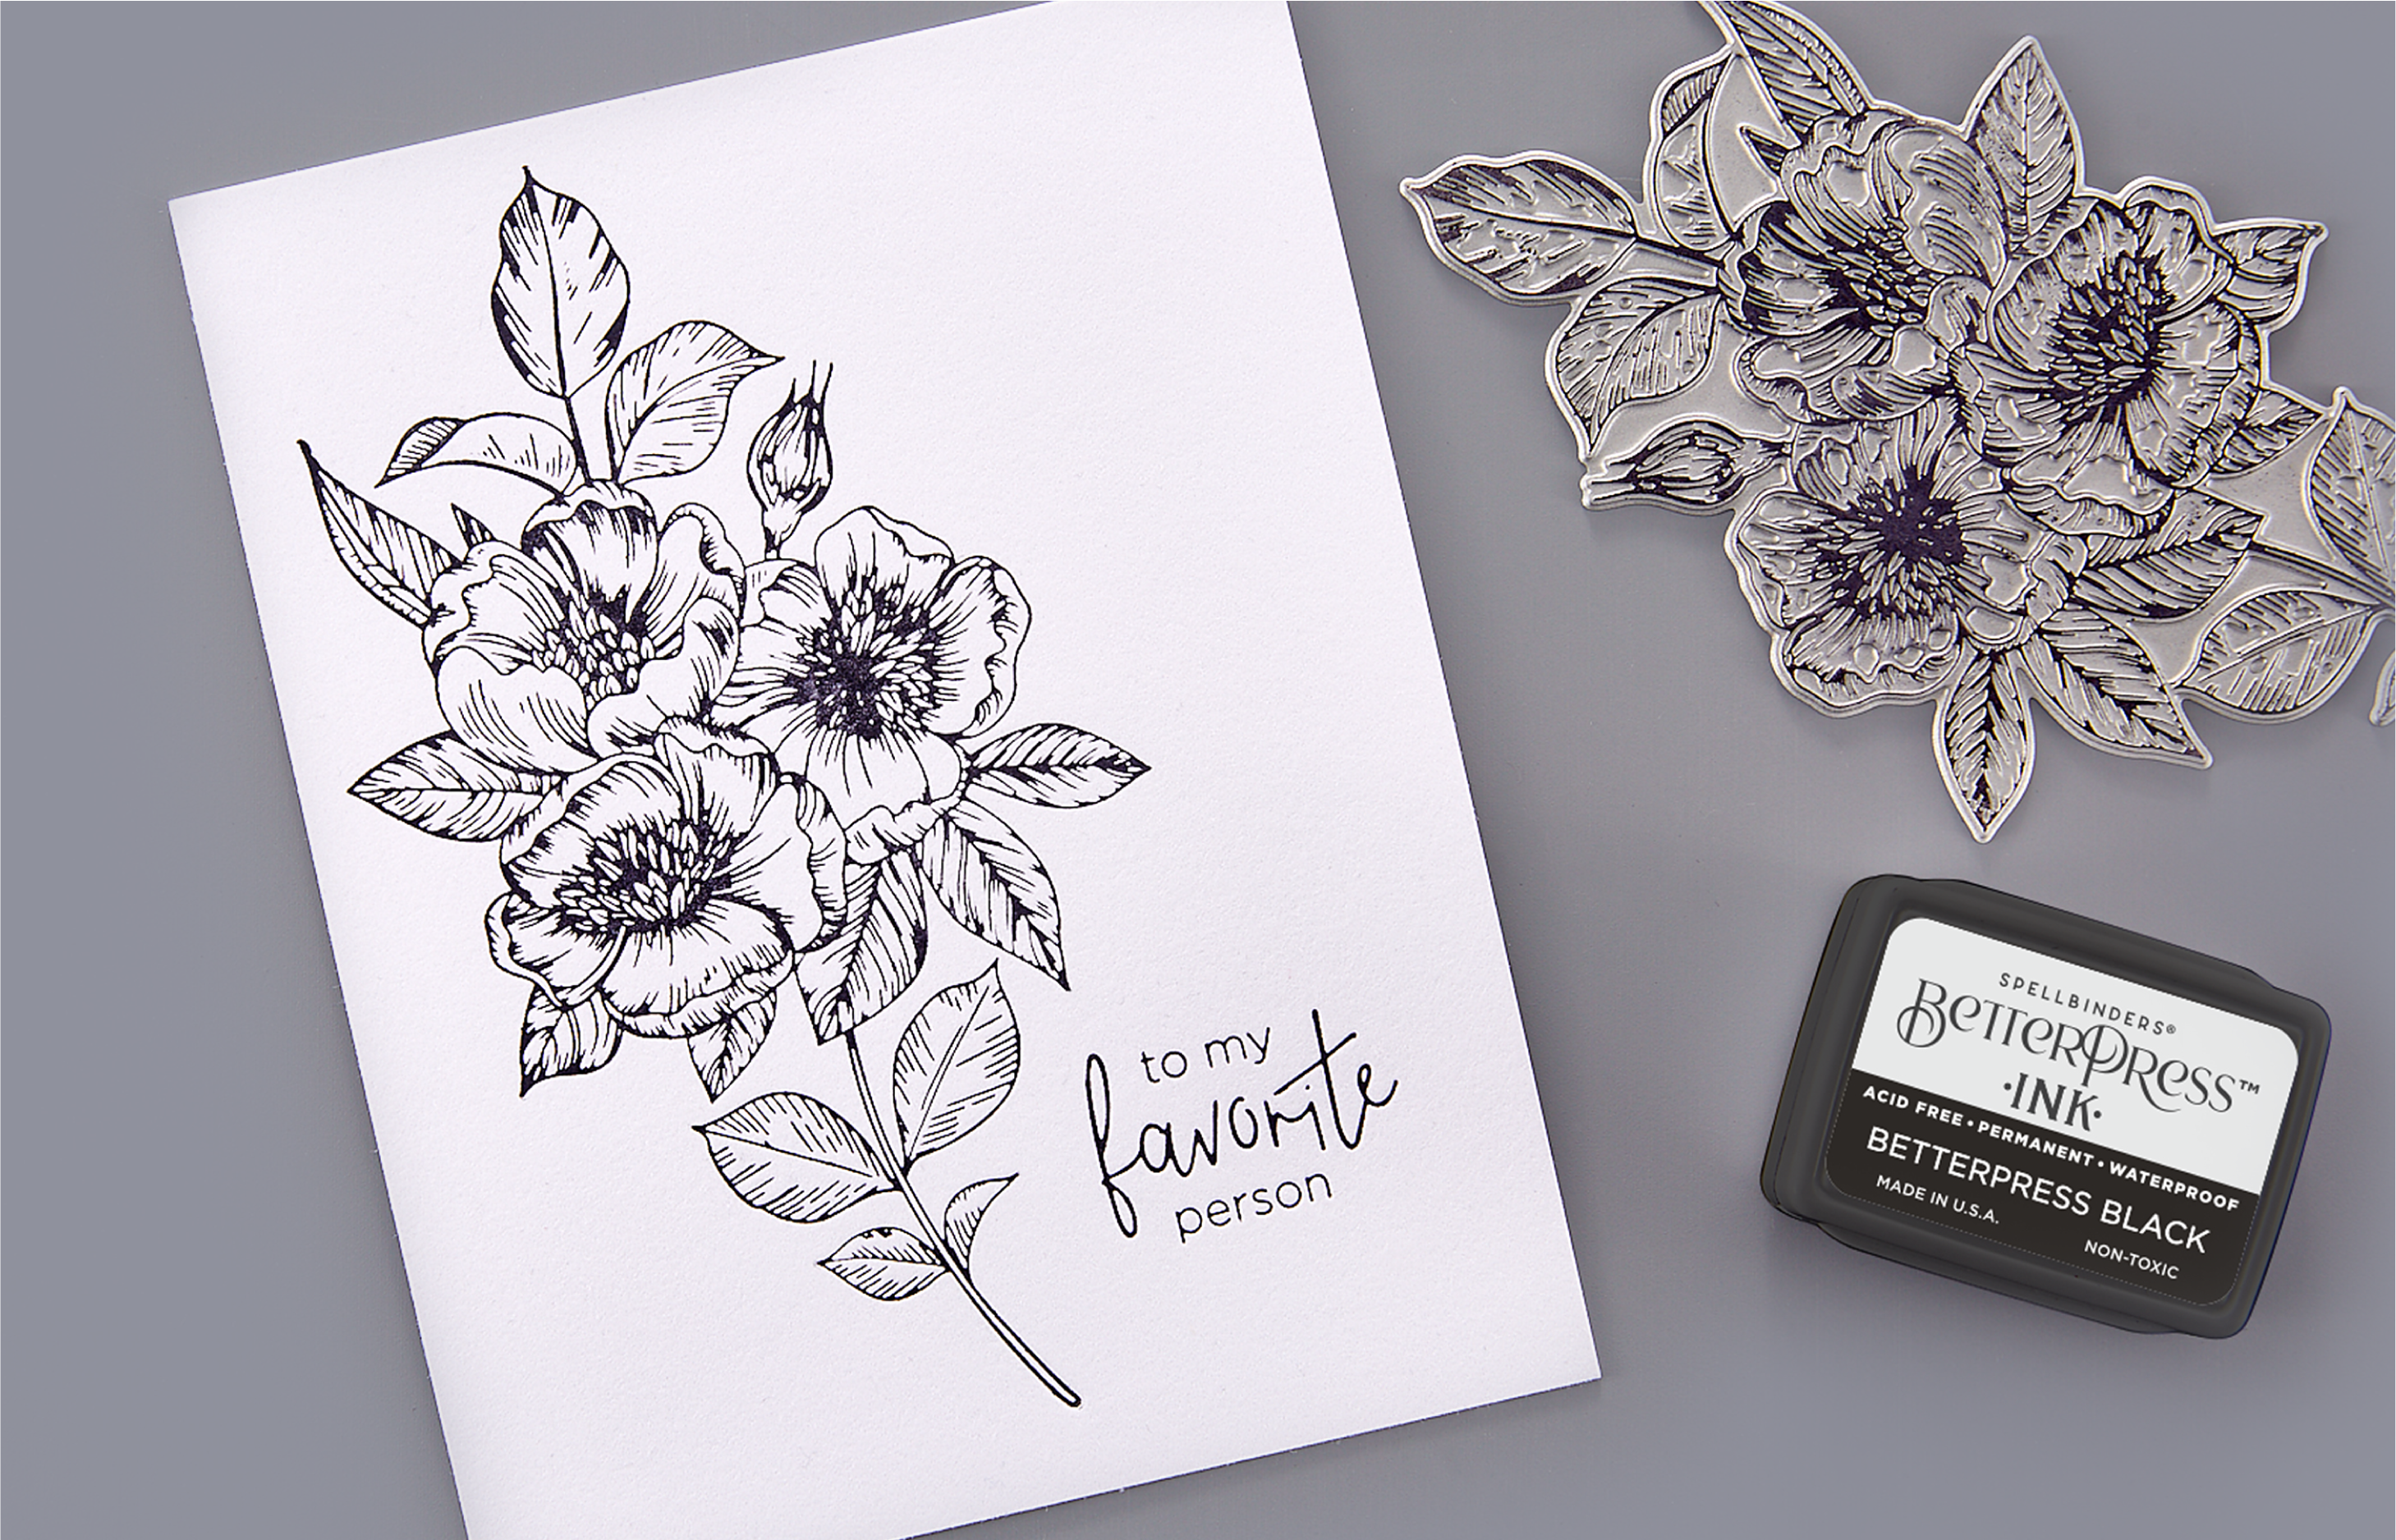
6
Carefully remove the Platen and the BetterPress letterpress design will be revealed! Carefully remove card panel from Platen. If repeating same design, reink and repeat.
Tips For Success
- Periodically clean press plates with Ranger Archival Ink™ Cleaner to assure a clean, detailed impression.
- To clean the plates, remove from magnetic pad in the chase; using a lint-free cloth (such as a flour sack towel), apply Ranger Archival Ink™ Cleaner to cloth and rub plates. We recommend rinsing with dish soap and water to remove any residue. Dry thoroughly before using.
- BetterPress Ink is an oil-based dye ink. When dry the ink will not rewet, making it perfect for coloring with dye inks and watercolor.
- BetterPress Ink Pads should be periodically reinked for the best impressions from the press plates.
- Other cardstock and papers can be used, but there may not be the same impression as is achieved with the cotton card panels.
- If using double weight cotton card panels, remove shims from beneath the magnetic base of the chase.
- It is not recommended to use pigment ink. The foam pad and ink may apply too much ink to the press plate and will result in an over inked impression.
- Other dye or oil-based inks may be used, but the impression may not be as dark as with the special formulation of BetterPress Ink.
- When die cutting an image that has been “BetterPressed”, use a pristine top cutting plate. Because of the thickness and delicate nature of the cotton card panels, any cuts or impressions in the top cutting plate may transfer to the die cut card panel image.
- Keep a pair of tweezers handy for use with the Best Ever Craft Tape. Peel back the tape with tweezers; remove card panel but keep the folded back tape in place. Put the next card panel in place and just fold down the tape on the card panel corners again. You will be able to get quite a few pressings before having to replace the tape.