You already know that rubber stamps are a fun and versatile crafty supply. Did you know you can use your stamps for stitchery patterns also? Read on for a quick and easy way to go from stamp to stitchery in just a few easy steps!
For a while now I have wanted to find a way to easily use my stamp designs as embroidery designs. Of course I could simply stamp on the fabric but I didn’t want to chance having the ink show or even possibly smear.
I laid in bed one night contemplating this when it occurred to me, if you can print on the Stick ‘n Stitch then surely you can stamp on it too!

Stick ‘n Stitch is a sheer piece of paper with an adhesive on the back of it that you can run through your printer. It is thin enough that I think you could probably trace a design on it as well. And of course, as I discovered, you can stamp on it also. When you peel the backing off you have a large thin paper sticker. You place it on top of the fabric you are doing your stitching on and stitch right through it. When you are finish stitching, you simply run it under cold water. The paper and adhesive dissolve away.

Begin by pressing your fabric that you plan to stitch on. Cut a piece of Stick ‘n Stitch roughly the size of your fabric. I found that I like it to be at least the size of my hoop. Stamp your image (I used my I’m Stuck On You stamp) onto the center of the Stick ‘n Stitch. I stamped with Ranger Ink Shadow Grey Archival Ink. I found through a little trial and error, that I like the lighter color for stitching on. I tried it on a test project with black ink and found it hard to see the difference between my dark-colored stitches and the stamped line. The ink dries very quickly and does not smear.
Important note - if you use a different ink, you need to be sure that it is water-resistant. You don’t want ink that will activate and run onto your stitchery when you go to remove the Stick ‘n Stitch.

Remove the backing on the Stick ‘n Stitch.

Place the Stick ‘n Stitch down onto your fabric (right side up). Run your hand over it to smooth out any wrinkles.

That’s it! No ironing, just pop it into your hoop and begin stitching! I did a
back stitch to outline my letters. A
stem stitch would also look nice to outline the letters.

When you are done stitching, simply run the fabric under water and rub the paper with your fingers. Roll your fabric in a towel to wring it out and then spread it out to dry. I let it air dry while I work on the next step.

Cut two pieces of felted wool for the appliqués. Add HeatnBond to the back of the fabric.
What is Felted Wool? You have heard me talk before about wool felt and craft felt, and now
FELTED WOOL, what is the difference? Wool felt is made up of wool fibers and is compressed together to create a solid surface, think of particle board. It can be made from 100% wool fibers (stiffer) or mixed with rayon fibers (softer). Craft felts (think about the kids craft stuff) is 100% acrylic. It can melt if you try to iron it. If you wash and dry the wool felt it will get puffy and thicker. It is then called “felted wool felt”.
Felted wool is woven wool fabric that has been washed and dried with heat. The process makes the wool shrink and become very soft. Felted wool has a weave that is very tight and used a lot in appliqué because it is resistant to fraying. You will find lots of places specializing in hand dyed felted wool in beautiful colors. I am using Weeks Dye Works felted wool. It is linked in the supply list below from Amazon. It and other brands are available in many independent quilt and fabric shops. If you are interested in trying felted wool, check on
Etsy. There are several sellers selling smaller pieces at a lower price.
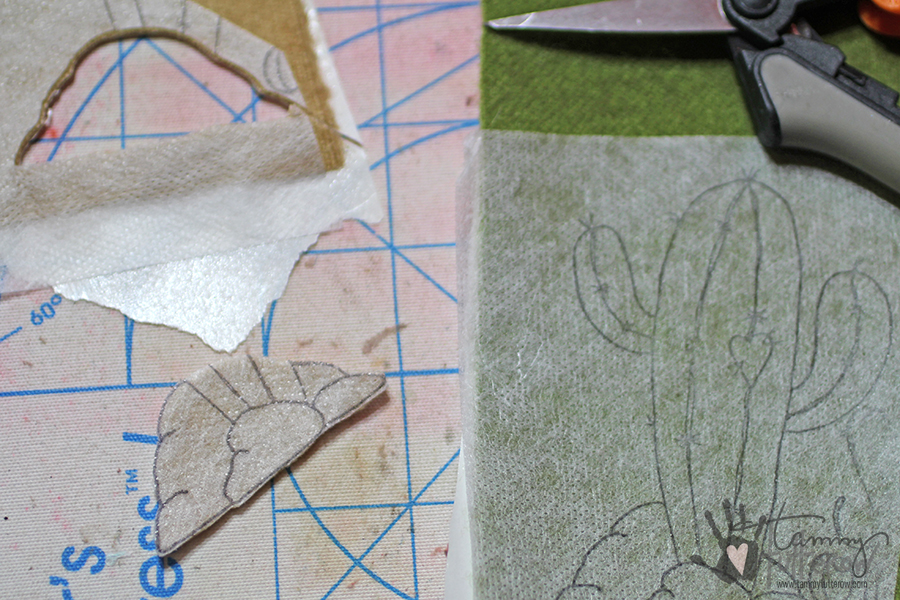
I stamped the image two more times on Stick ‘n Stitch to use as appliqué patterns. Place the two pattern pieces on the front of the two pieces of felted wool and cut them out along the edges.
On the cactus, I cut the stem all the way to the “ground” like it would be behind the rock.

On the rocks, I cut a slit through the center along the top edge of the front rock. Peel off the Stick ‘n Stitch pattern pieces and set them aside.

Press your base fabric again. Slip the cactus into the slit in the rocks. Place the assembled appliqué pieces on the fabric next to the words. Use an iron to activate the HeatnBond to adhere the appliqué pieces in place.

Add a
blanket stitch around the edge of the cactus and rock.

Use the pattern pieces as a reference for the cactus and rock details. Use an air erase pen to draw the details onto the appliqué.
If you have never used an air erase pen, it is pretty neat! You can mark on fabric with them. It goes away after a few hours leaving no trace of the ink behind.

Stitch the additional details on the marker lines.
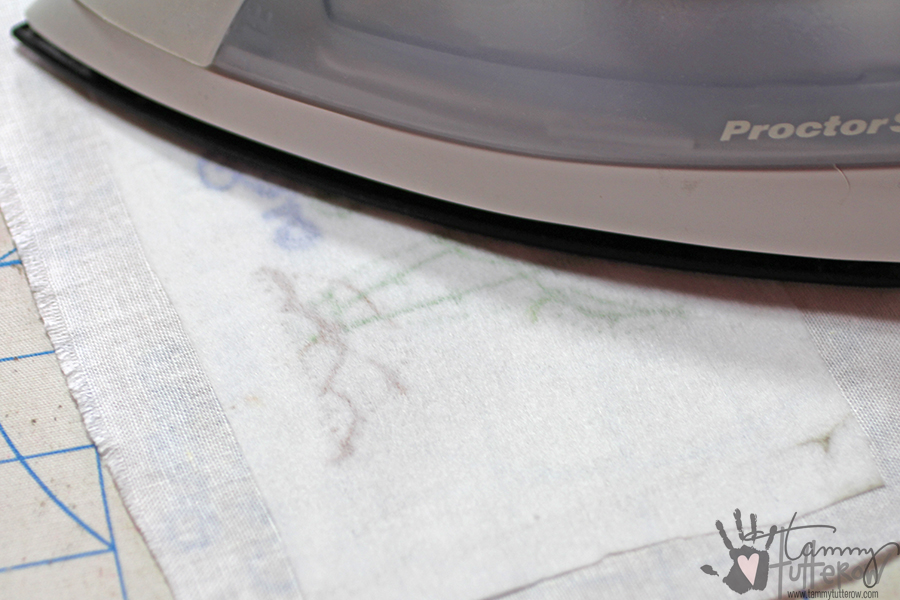
When I finish stitching, I like to add a heavy craft fusible craft interfacing (HeatnBond) to the back of my stitchery to keep it nice and smooth and tight looking.
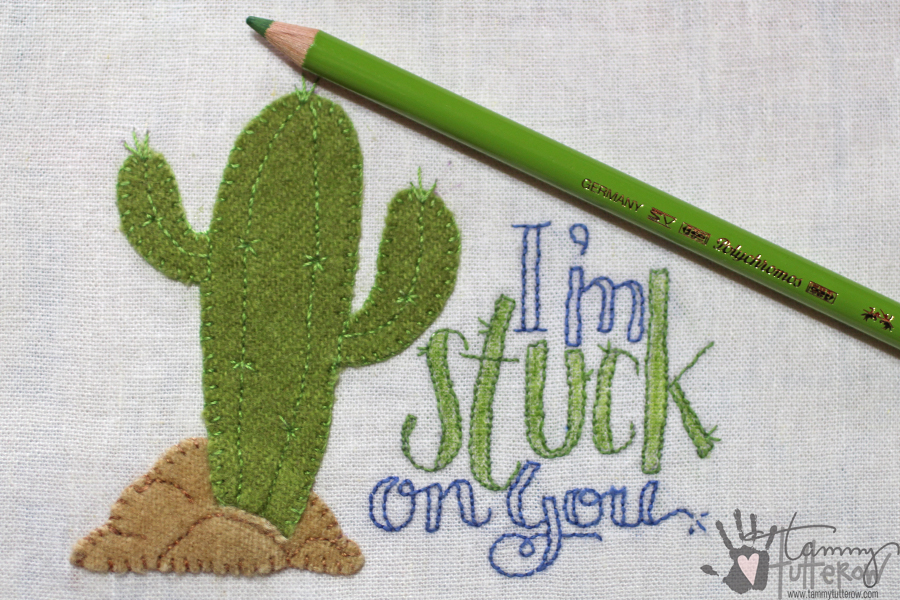
I did a project not long ago where I decided to fill in all the outlined letters with a
satin stitch. I remembered that I am not very good at satin stitches. Since then I have been pondering different ways to add color to the inside of my letters. My solution- Faber Castell Polychromos Colored Pencils. These pencils are oil based and a bit softer than colored pencils that are wax based (Prismacolors). I feel like the color goes onto the fabric more consistently than other colored pencils (I tested several) and stays put without bleeding or smearing when wet.
To add the color, I simply colored in the open letter spaces. Super easy and a fun touch! Much easier than a satin stitch!

The final touch, buttons of course! I added a small yellow flower and a red heart from the
June Button Lover’s Club from
Just Another Button Company. If you missed out on the June box, no worries, both of these buttons are available a la carte in their shop.

This little project was so fun to stitch and make! For now I have it tacked to a piece of mat board until what I want to do with it. Its kind of funny, I wanted to stitch it but wasn’t sure what to make with the final stitchery. Until then, I will just enjoy it like this.
I love that I was able to find another way to make art with my stamps. I love the designs so much, it is fun being able to enjoy them by “coloring” them with needle and thread!
 http://tammytutterow.com
Supplies:
SBS-133 I'm Stuck On You stamp
Buttons: Just Another Button Company
Felted Wool: Week's Dye Works: Gulf and Fawn
Stick 'n Stitch: Sulky
Interfacing: Therm O Web Craft Fusible Extra Firm Interfacing
Thread or Floss (I used Sulky 12 wt cotton Petites 1177, 1226, 0521)
Adhesive: Therm O Web HeatnBond Ultra Hold
Air Erase Pen: Dritz
Read more


 />
/>

 Next, I trimmed about ¼” off the bottom of one of the die cuts to create a flat edge. This helps the card base stand upright and prevents it from falling to the side. I also scored the same panel at about 1” at the top to create a hinge and adhere the two together to create a card base.
 Next, I die-cut and embossed Crest Frame and Crest dies from the Victoriana Crest set out of gold mirror cardstock and foam mounted onto the card for a pop of dimension. I also die-cut an oval using oval Insert die from the Victoriana Crest set out of patterned paper. I chose a tiny polka dot paper from the Snow Fun paper pad from Carta Bella and foam mounted it onto the card.
 To dress this oval up I adhered pearls around the edge of the oval. I used self adhesive pearl strings, that made it much easier to adhere them as I didn’t have to space each pearl individually on my card.
 To create embellishment for my project I die-cut 4 stocking using Stocking die from the Build a Stocking set out of patterned paper (cut 2 pc) and white glitter paper (cut 2 pc). I cut white stocking into pieces and adhered onto patterned paper die cuts. Next, I die-cut bells out of gold mirror cardstock and adhere onto the stocking.
 I also added a bow out of gold mirror cardstock and foam mounted it onto the stocking. Finally, I foam mounted stockings onto the card and added little die candy canes tucked inside.
One last thing I added was a die cut number 25 and a simple Christmas Blessings sentiment.
I also added a bow out of gold mirror cardstock and foam mounted it onto the stocking. Finally, I foam mounted stockings onto the card and added little die candy canes tucked inside.
One last thing I added was a die cut number 25 and a simple Christmas Blessings sentiment.
 Spellbinders Supplies:


