
Taxes and shipping calculated at checkout
 />
/>


Introduction to Wax Seals

Everything old is new again! We are excited to introduce wax sealing to the Spellbinders line of products. The Sealed Collection combines not only the traditional art of wax sealing, but also adds in a range of beautiful dies, glimmer plates and sentiments to create the perfect card!
Wax seals add a touch of elegance and charm to papercrafting, not only perfect for envelopes, but also wonderful on a card front or adorning the perfect gift wrapped package. Once you acquire the knowledge of how to create wax seals, you are on your way to a time-honored tradition that has become the latest trend in crafting!
Wax Seal Videos
What is Wax Sealing?

Wax sealing is a decorative technique that involves using melted wax to create an impression or seal on an envelope, document, or container. It's a tradition that dates back to ancient civilizations and was commonly used to secure and authenticate important documents. Today, it's often used for decorative purposes, especially on invitations, cards, letters, and crafts. To create a wax seal, a wax stick or bead is melted and dripped onto the desired surface. A seal, typically engraved with a design or initial, is then pressed into the molten wax, leaving behind a raised and often intricate impression. This practice adds a touch of elegance and personalization to your papercrafts and other projects.
What Tools Do I Need to get Started?

First thing first, you'll need to set up the workspace. If you purchased the Spellbinders Wax Seal Starter Kit, you have almost everything you need to get started. A kettle to heat your wax, a spoon for melting and a heat resistant surface is all of the “hardware” needed. You will also need a tea light candle, to melt the wax beads. Plus, we suggest keeping a damp thicker paper towel handy to clean the spoon during the process.
I have Everything I Need! What now?

How to Wax Seal

Create a wax seal station that is clear of clutter. Even with the silicone mat, you are working with melted wax and a tealight candle, so make sure you are working on a heat-safe work surface away from children.

The candle must be placed under the spoon holder and the spoon leaning on top. The candle will melt the wax inside the spoon. The process takes about 3-4 minutes to melt 4 beads, less once the spoon is hot.

Once the wax has melted in the spoon, pour it onto your project or onto the silicon mat and gently press the stamp in the center of the wax blob.

Leave the stamp still in place from 15 to 20 seconds. Then, remove it and the magic will happen!
4 beads are the right amount to obtain a beautiful wax seal stamp, especially at the beginning.

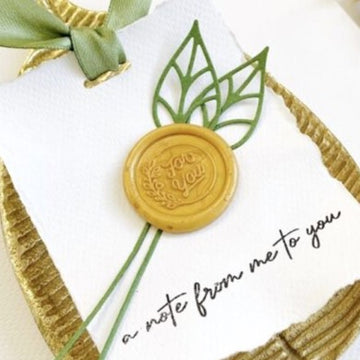
Here’s an example where 4 beads of Gold were used. Before pressing the stamp, two leaves were incorporated as well.

Depending on the wax seal style you want to obtain, whether it's a perfectly round or a more artistic shape, you will need to vary the amount of wax beads. For a traditional wax seal look, 3 beads are enough.

If you prefer a wax seal that stands out,try increasing the number of beads, like in the example above. The result will be a fun chunky look.

Talking about shapes instead, what varies in this case is not the amount of beads, but rather the way you pour the wax. For a perfectly round shape, wax should be poured without moving the spoon, so that the wax falls down in the same spot.

Moreover, the stamp should be placed in the center of the poured wax, pressing evenly to avoid wax from squeezing on one side. It could sound difficult but, with a little practice, it is easy to obtain a beautifully round wax seal. Here, the wax seal was used to secure the twine with beads wrapped around the envelope.

Although, a wax seal with an irregular border is the one that comes closest to traditional wax seals of the past.

Here, the wax was poured on the ribbon that wraps the letter, without thinking to much and enjoying the process.

If you are looking for fun and not perfection, there are other pretty styles you might appreciate. One of our preferred is the wonky style.

To reach this irregular wax seal border, you do have to move the spoon while pouring the wax. Try pouring the wax in a triangle shape and then, press the stamp in the center.

Another fun idea is a seamless wax seal. There is no border around the stamped image and you achieve it with just a tiny amount of wax, about two beads.

To create the marbled effect of the wax, melt together different color beads. Pour down the wax in a circular motion and last, press the stamper. The result was this awesome mix of colors.

The seamless technique works very well with designed images, like the Forever Rose Stamp. You can also cut the image itself and use it as an embellishment. Here is an example where we included the Rose seal onto a Christmas ball.

The rose was first stamped onto the silicon mat provided in the kit. Then, when it cooled down, we cut the rose with a precision knife, as close as possible to the borders. Last, we glued the rose on the decoration with a drop of melted wax and voilà, a beautiful and unique Christmas gift for a friend!

1
Unpack and lay out kit contents. You will need to provide a tealight which will be your heat source.

2Create a wax seal station that is clear of clutter. Even with the silicone mat, you are working with melted wax and a tealight candle, so make sure you are working on a heat-safe work surface away from children.

3Choose color or colors of wax beads to start, the wax seal stamp to use, and the surface to place the wax seal.
4Light the candle and place the wax bead warmer centered over the candle. Place spoon in the warmer opening


Create a wax seal station that is clear of clutter. Even with the silicone mat, you are working with melted wax and a tealight candle, so make sure you are working on a heat-safe work surface away from children.
The candle must be placed under the spoon holder and the spoon leaning on top. The candle will melt the wax inside the spoon. The process takes about 3-4 minutes to melt 3 beads, less once the spoon is hot.

Once the wax has melted in the spoon, pour it onto your project or onto the silicon mat and gently press the stamp in the center of the wax blob.

Leave the stamp still in place from 15 to 20 seconds. Then, remove it and the magic will happen!

4 beads are the right amount to obtain a beautiful wax seal stamp, especially at the beginning.

Here’s an example where 4 beads of Gold were used. Before pressing the stamp, two leaves were incorporated as well.

Depending on the wax seal style you want to obtain, whether it's a perfectly round or a more artistic shape, you will need to vary the amount of wax beads. For a traditional wax seal look, 3 beads are enough.

As you can see in the example here, there’s a little difference but still visible.

If you prefer a wax seal that stands out,try increasing the number of beads, like in the example above. The result will be a fun chunky look.

Talking about shapes instead, what varies in this case is not the amount of beads, but rather the way you pour the wax. For a perfectly round shape, wax should be poured without moving the spoon, so that the wax falls down in the same spot.

Moreover, the stamp should be placed in the center of the poured wax, pressing evenly to avoid wax from squeezing on one side. It could sound difficult but, with a little practice, it is easy to obtain a beautifully round wax seal. Here, the wax seal was used to secure the twine with beads wrapped around the envelope.

Although, a wax seal with an irregular border is the one that comes closest to traditional wax seals of the past.

Here, the wax was poured on the ribbon that wraps the letter, without thinking to much and enjoying the process.

If you are looking for fun and not perfection, there are other pretty styles you might appreciate. One of our preferred is the wonky style.

To reach this irregular wax seal border, you do have to move the spoon while pouring the wax. Try pouring the wax in a triangle shape and then, press the stamp in the center.

Here is another example with the beautiful Thanks wax seal stamper and Pastel Aqua wax.

Another fun idea is a seamless wax seal. There is no border around the stamped image and you achieve it with just a tiny amount of wax, about two beads.

To create the marbled effect of the wax, melt together different color beads. Pour down the wax in a circular motion and last, press the stamper. The result was this awesome mix of colors.

The seamless technique works very well with designed images, like the Forever Rose Stamp. You can also cut the image itself and use it as an embellishment. Here is an example where we included the Rose seal onto a Christmas ball.

The rose was first stamped onto the silicon mat provided in the kit. Then, when it cooled down, we cut the rose with a precision knife, as close as possible to the borders. Last, we glued the rose on the decoration with a drop of melted wax and voilà, a beautiful and unique Christmas gift for a friend!
Useful Tips
- To create a marbled effect, melt together different color beads and pour in a circular motion.
- While you can use a match to light the tealight candle, a long reach lighter is ideal.
- You can also create the wax seal on the silicone mat. Once cool, peel off and attach to desired surface with adhesive.
- When using a wax seal stamp that has a design with a "top and bottom", use a pencil to mark the bottom of a design on the outside of the wax seal stamp. Using just a pencil will not mar the stamp
- If the melting wax is bubbling, it is overheating; remove from the heat source and allow to cool and place back onto warmer again.
- To highlight the design of a finished wax seal, use the metallic ink marker and lightly dab onto the raised design. If there is too much ink on the tip, use a tissue or paper towel to remove some of the excess ink.


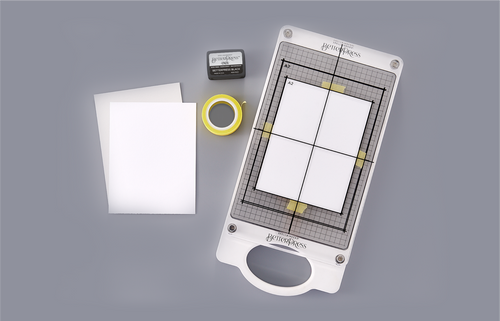
WHAT'S IN THE BOX

- Platen
- Chase
- Shims
- BetterPress Cotton Card Panels
- Best Ever Craft Tape
- BetterPress Ink
- BetterPress Press Plates
Additional Wax Seal Resources
Wax Seal Youtube Series
Educational wax seal video tuturials.
Glitter and Wax Color Matching Guide
Download this Wax Seal & glitter Color Matching Cheat Sheet.
Shop Wax Seal Starter Kit
Are you ready to get started? Spellbinders has everything you need to start wax sealing!
Shop Wax Seal Collections
Choose from our ever-growing library of Spellbinders designs to add an extra special detail to your cards.
FAQ
Project Inspiration
How To BetterPress

1
Place three Shims on base of Chase and layer magnet insert over Shims. Place BetterPress Press Plate on Chase (the magnet insert will keep the press plate from moving); use registration lines to determine correct placement.

2Place card panel on underside of Platen and use Best Ever Craft Tape to secure in place. The registration marks on the Platen match the marks on the Chase.

3Open BetterPress Ink Pad; lightly tap raised ink pad across the BetterPress Press Plate. The ink pad is raised enough that a brayer is not needed. Note: make sure to use a well inked pad; reink pads when necessary with BetterPress Ink Re-Inkers
4
Align Platen to gently sit on the 4 corner spring pins on the Chase. Do not press down.

5Place Chase with Platen onto manual die cutting machine. The machine rollers will evenly press down on Platen as the Chase is run through the machine.

6
Carefully remove the Platen and the BetterPress letterpress design will be revealed! Carefully remove card panel from Platen. If repeating same design, reink and repeat.
Tips For Success
- Periodically clean press plates with Ranger Archival Ink™ Cleaner to assure a clean, detailed impression.
- To clean the plates, remove from magnetic pad in the chase; using a lint-free cloth (such as a flour sack towel), apply Ranger Archival Ink™ Cleaner to cloth and rub plates. We recommend rinsing with dish soap and water to remove any residue. Dry thoroughly before using.
- BetterPress Ink is an oil-based dye ink. When dry the ink will not rewet, making it perfect for coloring with dye inks and watercolor.
- BetterPress Ink Pads should be periodically reinked for the best impressions from the press plates.
- Other cardstock and papers can be used, but there may not be the same impression as is achieved with the cotton card panels.
- If using double weight cotton card panels, remove shims from beneath the magnetic base of the chase.
- It is not recommended to use pigment ink. The foam pad and ink may apply too much ink to the press plate and will result in an over inked impression.
- Other dye or oil-based inks may be used, but the impression may not be as dark as with the special formulation of BetterPress Ink.
- When die cutting an image that has been “BetterPressed”, use a pristine top cutting plate. Because of the thickness and delicate nature of the cotton card panels, any cuts or impressions in the top cutting plate may transfer to the die cut card panel image.
- Keep a pair of tweezers handy for use with the Best Ever Craft Tape. Peel back the tape with tweezers; remove card panel but keep the folded back tape in place. Put the next card panel in place and just fold down the tape on the card panel corners again. You will be able to get quite a few pressings before having to replace the tape.